I recently gave a presentation at the Iowa Blogger Conference held at Iowa Central Community College in Fort Dodge, Iowa. The topic of my breakout session was "Video Production 101 for Bloggers." I am sharing my PowerPoint presentation here so that the attendees can access it at their leisure.
Friday, March 18, 2016

Tuesday, March 15, 2016
The Art of the Interview
As I write this article on a snowy Tuesday morning, a high
school student is working on his History Day project in the PLAEA video suite. One element of his project will be an
interview with a patent attorney, so he and I have been discussing how to conduct
a successful interview.
When shooting an
interview to be part of a video project, you have to visualize how it fits in
the entire project. Rarely is the entire
interview shown in one continuous segment.
Rather, the interview is cut into smaller segments, often called “sound
bites”.
Before the Interview
Select a quiet
location for the interview. Turn off the
radio, close the door to block out external noise, do what it takes to
eliminate unwanted sounds.
Write open-ended questions.
Avoid asking “yes or no” questions; try to ask questions that will draw
out the person being interviewed.
If possible, share the interview questions with your
intended subject beforehand. That gives
them an opportunity to formulate their replies.
Explain to your subject how you plan to interview them. Ask that they give you a second or two of
silence after you ask a question and before they reply. That gives the editor a quiet spot to begin
the video clip.
Ask the subject to restate the question or include it in their
answer. In most instances, the question
asked is not used in the final version of a video project, so the subject’s
answer needs to stand alone. If you
asked the subject what it was like the first time she went skydiving, she might
answer, “It was fantastic!” But that
sound bite would work better if the answer was, “The first time I went
skydiving was fantastic!”
During the Interview
 You should sit near the camera, just off to one side. Ask
your subject to ignore the camera and look at you as the interview
proceeds.
You should sit near the camera, just off to one side. Ask
your subject to ignore the camera and look at you as the interview
proceeds.
Make your subject feel comfortable. Having that one-eyed camera lens pointing at
you can be unnerving, to say the least.
Explain to your interview subject that you two are just going to chat
for a few minutes. If anyone makes a
mistake, you will just go back and answer that question again. “So relax and let’s have a good time while we
talk.”
With the camera recording, have your subject say and spell
their name and job title (if needed for the project). This video clip won’t be used in your project
but it is an excellent way to immediately identify the person in the clip as
you work on your editing.
Ask a question and then be quiet while your subject
answers. Give encouragement in the form
of non-verbal feedback. Smiles and nods
of encouragement from you are fine, but the audience doesn’t need to year you
saying, “Uh-huh” in the background.
If your subject’s answer is too long, ask them to re-phrase
it and answer it again. Your goal here
is to keep the sound bites short.
Listen to the answers and be prepared to ask follow-up
questions. Years ago, I was the camera
operator for an educator who was interviewing a stunt woman. The stunt woman answered a question about a
movie she worked on and finished her answer with, “And that was the time I
broke my back during filming.” The
interviewer nodded and then asked the next pre-written question. It would have been better for the interviewer
to ask a follow-up question like, “You broke your back? Tell me more about that.”

Ask what you didn’t
ask. Most times, the person being
interviewed has a story or anecdote they are just dying to share. All they need is for you to ask the right
question. So at the end of your
interview, ask them what you didn’t ask.
Your question could be, “What else would you like to share?” Or perhaps, “What is the one thing you are
dying to tell me about today?” Or even, “What did I forget to ask you?”
As is the case in
all video production, the secret to success is in planning before you
shoot. So plan ahead, write open-ended
questions and make the actual interview a fun and positive experience for
everyone.
Thursday, August 27, 2015
Presentation to PLAEA Behavior Strategist meeting
Here is the PowerPoint that was shown to the Prairie Lakes AEA Behavior Strategist meeting on August 27, 2015.
Planning, Shooting and Editing Video - Common Denominators Across Multiple Platforms
Planning, Shooting and Editing Video - Common Denominators Across Multiple Platforms
Sunday, June 15, 2014
From the t.i.c.l. Conference 2014
Here is the PowerPoint presentation that I used at the 2014 t.i.c.l. Conference at Buena Vista University. The previous post has links for both training videos mentioned in the PowerPoint.
PowerPoint:
Any Video Converter training
Video Slimmer for the iPad
PowerPoint:
Any Video Converter training
Video Slimmer for the iPad
Thursday, April 10, 2014
Make it so!
It seemed so simple during the planning sessions. Teachers would shoot video in their classrooms, upload the video clips to the web and then our PLAEA consultants would review the video clips. As long as the teachers have access to a smart phone or an iPad, it should be easy as pie. Shoot, upload and view.
That was our plan. Now, as Captain Jean-Luc Picard used to say, "Make it so!"
Then we started getting phone calls and emails from the teachers who were attempting this feat. The videos they shot were taking forever to upload, sometimes several hours. Sometimes, the website would "time out" and the entire process would come to a screeching halt. What is the problem here?
After some investigation, we discovered that the file sizes of those video clips were just too darned big. For example, an iPad shoots video in high definition, so even a 20 minute video clip is nearly 3 gig in size. That's right, 3 gigabytes for 20 minutes. How can you shoot a 50 minute classroom presentation and then upload it to your Dropbox account that has a maximum capacity of 2 gig?
My suggestion was to use video conversion software to convert the video clips to a more compressed format. Using video conversion software also lets the user downsize the resolution from HD to SD. Changing the format and downsizing the resolution will shrink the size of the video file, sometimes dramatically. That 3 gig video clip became a 725 meg clip after conversion and downsizing. That's small enough to easily fit in your Dropbox or Google Drive account.
Different cameras and computers require different software to achieve this file compression. So I'm producing videos to address that.
What if you are using a Flip camera and transferring that video to your Windows 7 computer? I suggested our team use Any Video Converter. That's freeware that is available from CNET. Then I recommended the converted clip be uploaded to a Google Drive account.
Here is the video I created to explain the process.
If you are using an iPad, then it's even easier because it can all be done with your iPad. Two apps, GDrive and Video Slimmer, allow you to compress your video clip and then upload it to your Google Drive.
Again, I produced a video to demonstrate the process.
That's not all of the camera and computer combinations out there. But these two procedures and the accompanying instructional videos should help our classroom videographers to successfully shoot and upload their projects. As additional instructors contact us, I'll search for solutions that apply to their specific hardware and computer operating systems.
That was our plan. Now, as Captain Jean-Luc Picard used to say, "Make it so!"
Then we started getting phone calls and emails from the teachers who were attempting this feat. The videos they shot were taking forever to upload, sometimes several hours. Sometimes, the website would "time out" and the entire process would come to a screeching halt. What is the problem here?
After some investigation, we discovered that the file sizes of those video clips were just too darned big. For example, an iPad shoots video in high definition, so even a 20 minute video clip is nearly 3 gig in size. That's right, 3 gigabytes for 20 minutes. How can you shoot a 50 minute classroom presentation and then upload it to your Dropbox account that has a maximum capacity of 2 gig?
My suggestion was to use video conversion software to convert the video clips to a more compressed format. Using video conversion software also lets the user downsize the resolution from HD to SD. Changing the format and downsizing the resolution will shrink the size of the video file, sometimes dramatically. That 3 gig video clip became a 725 meg clip after conversion and downsizing. That's small enough to easily fit in your Dropbox or Google Drive account.
Different cameras and computers require different software to achieve this file compression. So I'm producing videos to address that.
What if you are using a Flip camera and transferring that video to your Windows 7 computer? I suggested our team use Any Video Converter. That's freeware that is available from CNET. Then I recommended the converted clip be uploaded to a Google Drive account.
Here is the video I created to explain the process.
If you are using an iPad, then it's even easier because it can all be done with your iPad. Two apps, GDrive and Video Slimmer, allow you to compress your video clip and then upload it to your Google Drive.
Again, I produced a video to demonstrate the process.
That's not all of the camera and computer combinations out there. But these two procedures and the accompanying instructional videos should help our classroom videographers to successfully shoot and upload their projects. As additional instructors contact us, I'll search for solutions that apply to their specific hardware and computer operating systems.
Friday, January 24, 2014
Sound Advice
 |
| Combo headphone-mic headset |
Video conferencing
is amazing. The idea that we can turn a
meeting room into a makeshift television studio and broadcast to the world is
astounding, even to a veteran media person like me. In order to have a successful broadcast, we
need to use the right tool for the job.
When we’re dealing
with video conferencing, we are broadcasting two things: picture and
sound. And while everyone understands
that the video camera needs to show what the viewer wants to see, it can be a
challenge to have the microphone pick up what everyone wants to hear.
Audio rarely
receives the attention it deserves, even though so much of the information
conveyed during a video conference is actually heard rather than seen.
So, what tools do we use to gather sound? The microphone that is built in to your
laptop does a pretty good job if you are the only person on your end of the
conference. However, using the built in
mic and speaker can often set up a feedback or echo effect, where your mic
hears and rebroadcasts the output of your speaker. You will avoid that problem by using a combo
headphone-mic headset like the one pictured.
 |
| Blue Snowball mic |
If you have a group
of people gathered around a table, you need a different kind of microphone to
hear everyone clearly. The Blue Snowball
microphone can be switched from a cardioid pattern to an omnidirectional
pattern, which means it can be used by a single person or set in the middle of
a table to pick up an entire group of people.
It connects via a USB cable to your computer and is compatible with
Skype and other conferencing software.
Another style of
microphone that is well suited to gathering sound at a meeting is the PZM or
boundary microphone. It sits flat on the
table and picks up reflected sound. This
is the style of mic used with a Polycom and AVer video conferencing system. Some models, such as the MXL-404 (pictured)
also connect to your computer via USB.
 |
| MXL-404 PZM Mic |
Wednesday, September 19, 2012
Tech Friday Presentation on Basic Editing
This Friday will be the first Tech Friday at Prairie Lakes AEA. It's an opportunity for staffers to receive training on various types of technology available to them. I will be talking about basic video shooting and editing using Windows Movie Maker. While it is not my favorite editing package, it is available on all staff laptops here at the agency. It's here, it's free...so let's use it.
I'm embedding the PowerPoint I will be using so it will be available to attendees and anyone else who may get some mileage out of it. I'm sure you'll find better tutorials out there, but this is the one I'll use to begin our conversations about media production.
I'm embedding the PowerPoint I will be using so it will be available to attendees and anyone else who may get some mileage out of it. I'm sure you'll find better tutorials out there, but this is the one I'll use to begin our conversations about media production.
Wednesday, August 22, 2012
NEW FCC Rules on Closed Captioning for Web TV Content
An article seen on gigaom.com advises us that "Web TV needs to have captions starting next month, FCC rules". This was established with the "Twenty-First Century Communications and Video Accessibility Act of 2010" and reaffirmed by an FCC ruling just a few days ago.
 Does this apply to you? Are you legally required to CC all content you upload to your YouTube or Eduvision website?
First off, a caveat: I'm not a lawyer and I don't play one on TV. For legal advice, always consult your attorney. All right, moving on. From my reading, it appears that this applies to programming that has been shown on television and does not apply to "web-only" content. If you are producing content in your home studio or school media center, this law does not legally require you to add Closed Captioned content to your video projects that you upload and show online. That's my take on it, anyway.
However, this does not answer if you should provide CC or subtitles on your video projects. Does it serve your audience to have this content available to the hearing impaired? Is it a good idea even if it's not legally required? That is something you need to consider with your current and future video projects.
 Does this apply to you? Are you legally required to CC all content you upload to your YouTube or Eduvision website?
First off, a caveat: I'm not a lawyer and I don't play one on TV. For legal advice, always consult your attorney. All right, moving on. From my reading, it appears that this applies to programming that has been shown on television and does not apply to "web-only" content. If you are producing content in your home studio or school media center, this law does not legally require you to add Closed Captioned content to your video projects that you upload and show online. That's my take on it, anyway.
However, this does not answer if you should provide CC or subtitles on your video projects. Does it serve your audience to have this content available to the hearing impaired? Is it a good idea even if it's not legally required? That is something you need to consider with your current and future video projects.
Sunday, June 17, 2012
School announcements on video...No Money? No Problem!
Wednesday, March 21, 2012
I only have one rule: DON'T do this to your data projector!
My supervisor brought her Proxima data projector to me today. The picture is very dim, she said, and could I take a look at it? So I took her projector to the test bench to see if I could discover the problem.
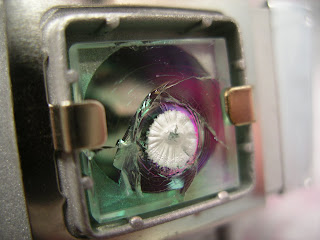
MELTED & SHATTERED GLASS
The first thing I did was open the little access panel on the projector and remove the bulb. What the heck was wrong with it? As you can see in the photo, the heat-absorbing glass in front of the bulb was melted and fractured. So then I looked at the lens cap and saw that it had begun to melt. So riddle me this....what would cause the glass panel on the front of the bulb as well as the lens cap to melt?
Right. Someone had powered up the projector and then placed the lens cap over the lens. All of that high intensity light was shooting out of the bulb, hitting the lens cap and reflecting back into the bulb housing. That creates a tremendous amount of heat; enough to melt a quarter inch thick piece of glass that is specially designed to absorb heat.
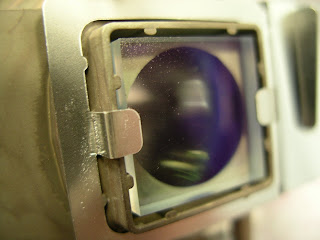
NORMAL GLASS
Normally, this would mean buying a $120 lamp to replace the one with the melted glass. However, I was fortunate enough to have a burned out lamp of exactly the same make and model. Removing the melted glass from one and replacing it with the intact glass from another allowed me to make the repair for nothing. Just dumb luck that I had not thrown away the bad bulb a week earlier.
As Barney Stinson says on TV, "I only have one rule." And my rule is this: NEVER, NEVER put the lens cap on a data projector while the bulb is lit. You will ruin your expensive bulb and also perhaps your expensive projector.

MELTED & SHATTERED GLASS
The first thing I did was open the little access panel on the projector and remove the bulb. What the heck was wrong with it? As you can see in the photo, the heat-absorbing glass in front of the bulb was melted and fractured. So then I looked at the lens cap and saw that it had begun to melt. So riddle me this....what would cause the glass panel on the front of the bulb as well as the lens cap to melt?
Right. Someone had powered up the projector and then placed the lens cap over the lens. All of that high intensity light was shooting out of the bulb, hitting the lens cap and reflecting back into the bulb housing. That creates a tremendous amount of heat; enough to melt a quarter inch thick piece of glass that is specially designed to absorb heat.

NORMAL GLASS
Normally, this would mean buying a $120 lamp to replace the one with the melted glass. However, I was fortunate enough to have a burned out lamp of exactly the same make and model. Removing the melted glass from one and replacing it with the intact glass from another allowed me to make the repair for nothing. Just dumb luck that I had not thrown away the bad bulb a week earlier.
As Barney Stinson says on TV, "I only have one rule." And my rule is this: NEVER, NEVER put the lens cap on a data projector while the bulb is lit. You will ruin your expensive bulb and also perhaps your expensive projector.
Friday, March 02, 2012
Tuesday, January 03, 2012
Storm Lake links

On January 4th, I'll be working with educators from the Storm Lake Community School District. We'll talk about simple ways to move video footage from a Flip Camera to a DVD, and I'm sure a hundred other questions and ideas will pop up during the day. I will also recommend some web sites and free software to use in their media production endeavors. Here are the links we talked about:
Any Video Converter is available here.
A tutorial on Windows Movie Maker, produced by Kent State University, is here.
DVD Flick, free DVD burning software, is available here.
Iowa AEA Online, a resource for Iowa educators, is here.
Videomaker Magazine has some wonderful free resources for video producers here.
Here is hoping we all have a great day at Storm Lake!

Tuesday, February 16, 2010
What's The Frequency, Kenneth?
The headline from the FCC says it all:
"OPERATION OF WIRELESS MICROPHONES IN THE 700 MHZ BAND IS PROHIBITED AFTER JUNE 12, 2010"
As part of the DTV switchover and re-allocation of frequencies, the frequencies between 698 and 806 Mhz (the 700 Mhz band) will no longer be allocated to television stations and will instead be used by broadband providers and public service entities. This change is effective June 12, 2010.
Here is the official statement from the Federal Communications Commission.
What does that mean to you, the Media Producer or Audio/Visual Person?
Wooo-boy!
It means that it will be illegal to use any wireless microphones on those frequencies after 6/12/10. Failure to comply with this FCC requirement may lead to civil and/or criminal penalties.
What do you do if you own wireless mics in that band? The FCC suggests you contact the manufacturer to see if the unit can be re-tuned to another frequency. The Feds have provided a website that lists the problematic equipment by manufacturer and model, and also tells if that unit can be modified or not.
And if said unit can't be re-tuned or modified; I guess it goes to the landfill.
While we don't care for this decision, we need to obey it. If our wireless signal interferes with a transmission from an ambulance or firefighter, then we've endangered the public and opened ourselves up to a whole lot of legal problems as well.
Wait until I tell my boss about this.
"OPERATION OF WIRELESS MICROPHONES IN THE 700 MHZ BAND IS PROHIBITED AFTER JUNE 12, 2010"
As part of the DTV switchover and re-allocation of frequencies, the frequencies between 698 and 806 Mhz (the 700 Mhz band) will no longer be allocated to television stations and will instead be used by broadband providers and public service entities. This change is effective June 12, 2010.
Here is the official statement from the Federal Communications Commission.
What does that mean to you, the Media Producer or Audio/Visual Person?
Wooo-boy!
It means that it will be illegal to use any wireless microphones on those frequencies after 6/12/10. Failure to comply with this FCC requirement may lead to civil and/or criminal penalties.
What do you do if you own wireless mics in that band? The FCC suggests you contact the manufacturer to see if the unit can be re-tuned to another frequency. The Feds have provided a website that lists the problematic equipment by manufacturer and model, and also tells if that unit can be modified or not.
And if said unit can't be re-tuned or modified; I guess it goes to the landfill.
While we don't care for this decision, we need to obey it. If our wireless signal interferes with a transmission from an ambulance or firefighter, then we've endangered the public and opened ourselves up to a whole lot of legal problems as well.
Wait until I tell my boss about this.
Tuesday, January 12, 2010
Distorted USB microphone with Garageband?
One of the teachers who I work with just gave me a phone call because he had a problem. I had loaned him a USB microphone so his students could record a radio newscast on Garageband. The students tried the mic and discovered that their audio was distorted, or "fuzzy" as they put it. How do you fix that?
I sent them the following steps.
1. Boot up your Mac and double click on Garageband to open it.
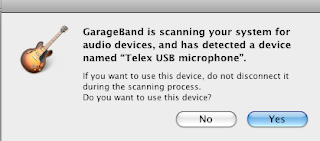
2. Plug in your USB mic. You should get this pop-up window:
3. Select YES
Do a test recording in Garageband to make sure the mic is working. Probably, your test recording will be distorted and look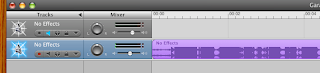 like this:
Note that the blue waveform has the top and bottom clipped off. This is called “clipping” and is caused by the signal being too loud. When you play back this audio recording, it will sound distorted and fuzzy.
Here is how to fix that.
4. Go to SYSTEM PROPERTIES and select SOUND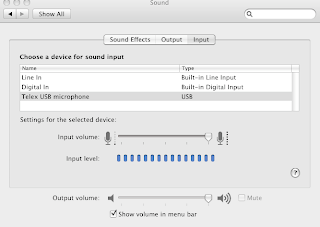
5. Choose INPUT from the tabs on in the window.
6. Select TELEX USB MICROPHONE (in this example.)
7. Speak into the mic and note the INPUT LEVEL. If the blue dots goe all the way to the right (as shown) then your audio signal is too loud and will be distorted.
8. Slide the INPUT VOLUME slider to the left as you continue speaking. Set the slider at a position where the blue dots never go all the way to the right.
9. Go back to Garageband and do another test recording.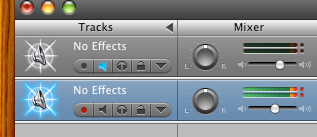
10. Look at the two bars that indicate your input level when you are recording. If they look like this, then you are too loud and your audio will be distorted.
11. If they look like this, then your audio levels
should be all right.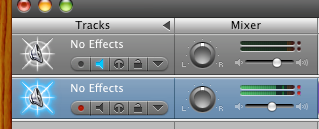
I sent them the following steps.
1. Boot up your Mac and double click on Garageband to open it.

2. Plug in your USB mic. You should get this pop-up window:
3. Select YES
Do a test recording in Garageband to make sure the mic is working. Probably, your test recording will be distorted and look
 like this:
Note that the blue waveform has the top and bottom clipped off. This is called “clipping” and is caused by the signal being too loud. When you play back this audio recording, it will sound distorted and fuzzy.
Here is how to fix that.
4. Go to SYSTEM PROPERTIES and select SOUND

5. Choose INPUT from the tabs on in the window.
6. Select TELEX USB MICROPHONE (in this example.)
7. Speak into the mic and note the INPUT LEVEL. If the blue dots goe all the way to the right (as shown) then your audio signal is too loud and will be distorted.
8. Slide the INPUT VOLUME slider to the left as you continue speaking. Set the slider at a position where the blue dots never go all the way to the right.
9. Go back to Garageband and do another test recording.

10. Look at the two bars that indicate your input level when you are recording. If they look like this, then you are too loud and your audio will be distorted.
11. If they look like this, then your audio levels
should be all right.

Monday, August 25, 2008
Cables, Connectors & Adapters
When training someone to work as a media or audiovisual assistant, they need to learn some basics right away.
At Prairie Lakes AEA, my department provides media support for our many meetings and presentations, so we need to know how to connect various audio and video media devices. Data projectors, PA systems, DVD players and so on. Learning the various cables, connectors and adapters might be a good place to start with a new person.
A connector can be either a plug (male) or a jack (female). For example, you might need a cable that's an RCA plug to an RCA jack.
Here are what they all look like:

RCA plug

RCA jack

XLR (or Canon) plug

XLR (or Canon) jack

BNC plug

BNC jack

Phono (quarter inch) plug

Phono (quarter inch) jack

Mini (eighth inch) plug

Mini (eighth inch) jack

VGA to VGA
At Prairie Lakes AEA, my department provides media support for our many meetings and presentations, so we need to know how to connect various audio and video media devices. Data projectors, PA systems, DVD players and so on. Learning the various cables, connectors and adapters might be a good place to start with a new person.
A connector can be either a plug (male) or a jack (female). For example, you might need a cable that's an RCA plug to an RCA jack.
Here are what they all look like:

RCA plug

RCA jack

XLR (or Canon) plug

XLR (or Canon) jack

BNC plug

BNC jack

Phono (quarter inch) plug

Phono (quarter inch) jack

Mini (eighth inch) plug

Mini (eighth inch) jack

VGA to VGA
Subscribe to:
Posts (Atom)