Wednesday, May 16, 2007

Picture But No Sound?


This happens occasionally in our Prairie Lakes AEA Lending Library. A school will return a videotape with a Post-In note attached, saying that when they played the videotape, there was a picture but no sound. Most of the time, the sound is there but the school VCR could not find it.

If this happens, here is the “short answer.”

1. Look at the remote for your VCR. Is there a button marked AUDIO (or perhaps SOUND)? If so, press the button.

2. If you don’t have an AUDIO or SOUND button, then you’ll have to access the MENU for your VCR. What you want to do is change the AUDIO output from HI-FI to NORMAL.

Every menu looks a little different, so I can’t post detailed instructions for your specific equipment.

All right, if you would like to know the theory behind what we just did, here is the “long answer.”

On every VHS tape, the following information is recorded:

A: This is the NORMAL (or LINEAR) audio track. Every VCR, even the oldest RCA SelectaVision VCR from 1977 records audio here.

B: This is the VIDEO TRACK. As you can see, the video is recorded as stripes on an angle.

C: This is the CONTROL TRACK. The control track records 30 electronic pulses per second that are used to synchronize the tracks.

For many VCRs, including very old and very inexpensive ones, this is everything that’s recorded on the tape.


D: Most newer VCRs also are able to record and playback audio in high fidelity sound, or HI-FI. The HI-FI track is embedded in the video track. Our illustration shows the HI-FI track in red.

Sometimes, because of equipment failure or operator error, a Hi-Fi audio track is recorded with no sound. (It’s like there is a highway with no cars on it.) When you play such a tape, your VCR senses there is a Hi-Fi track and plays it. But no sound was recorded on that track…it’s just an empty audio track. So you have picture and no sound.

The solution is to tell your VCR to quit horsing around and just play the NORMAL audio track.


If you are lucky enough to have the remote handy, and if the remote has an AUDIO button, it’s a simple matter to switch from HI-FI to NORMAL audio playback. If that’s not an option, then you have to open the MENU on your VCR and find the AUDIO or SOUND command, and switch that to NORMAL.

Unfortunately, we do sometimes discover a tape with this problem in our library. By selecting the NORMAL audio track playback on your VCR, you will be able to work around this problem and show your video tape in class as planned.

Friday, October 27, 2006

Greenscreen tips and ideas

If you are interested in shooting scenes using chromakey (also known as greenscreen, bluescreen or bluebox), here is an interesting blog that discusses shooting chromakey for post production.

At the 2006 VidExpo this fall, a graphic artist from a Denver television station discussed shooting greenscreen for post production.

Many of us think of using an external box or video switcher to create greenscreen effects in real time. And while this may be the way to go when you are shooting a weatherperson in front of a map, it's not always the best way to go.

You can make some fascinating composite video clips by using the greenscreen capabilities of Final Cut Pro, or even something as simple as an Avio or Casablanca editing appliance.

Take a look at the linked article and see if you can stretch your imagination when keying in your next project.

Friday, September 22, 2006

Planning a video yearbook

In the old days (back when I was in High School) everyone would get a printed, hardbound yearbook at the end of the school year. You remember those....there would be photos of all the class members, sports highlights, music concerts, plays and a lot of shots of students goofing around.

Here in the 21st century, the old style printed yearbook still is around. However, more and more schools across the country are producing video yearbooks in addition to the more traditional printed yearbook. In a video yearbook, you show the visuals and sounds that make your High School years memorable.

The key to a video yearbook is planning ahead of time. When I work with schools who want to produce a video yearbook, I try to have a planning session with them during the first three weeks of school, so they have an idea of what they need to do before Homecoming and other events occur. It's tough to shoot video of the Homecoming game if it is already over.

You start by thinking of your video much like a printed book. Books have chapters, and so do video yearbooks. What chapters will your video have? Sports? Fine arts? Speech contest? Mock trial? Everyday life in the classroom?

What do schools include in a Video Yearbook?

Senior portraits

Music, drama or other activities

Competitions & Awards

Every day life at school

Teachers

Sports


How will you sort your images into "chapters"?

Example #1

I. Fall Activities

II. Winter Activities

III. Spring Activities

Example #2

I. Sports

II. Music and drama

III. Everyday life

IV. Graduation

Example #3

I. Senior collage part one

II. Football and basketball

III. Senior collage part two

IV. Life in the classroom

V. Senior collage part three

VI. Drama, arts, music

VII. Prom and graduation


Here are the steps I recommend:

1. Make an outline of “chapters” you want in your yearbook.

2. Write down the specific video clips, still photos, sound bites or interviews you want for each chapter. Find out what you may already have.

3. Assign someone to videotape events you need (Homecoming, Class Play, etc). Have shots of as many different students as possible, not just your friends

4. Obtain permission to use any copyrighted music.

5. Gather all still photos needed. Carefully label them so that they can be returned to owners.

6. Log tapes so you know what clips are on each tape.

7. Put still photos in the order you plan to use them in the yearbook. A still photo is on the screen for 5 seconds; so it takes one minute to show 12 photos. Make sure you don't want to show 400 photos in 10 minutes.

8. Write down all titles and credits before you begin editing. Check the spelling of names.

9. Allow enough time to complete the project. Then add an additional 25% to that, because something always ends up taking longer than you thought it would.

Friday, September 08, 2006

Hand holding your camera


There are some times that you just can't use a tripod while you're shooting video. Yet you still want clear audio and a crisp picture without shaking or distracting camera movement. So, what do you do?

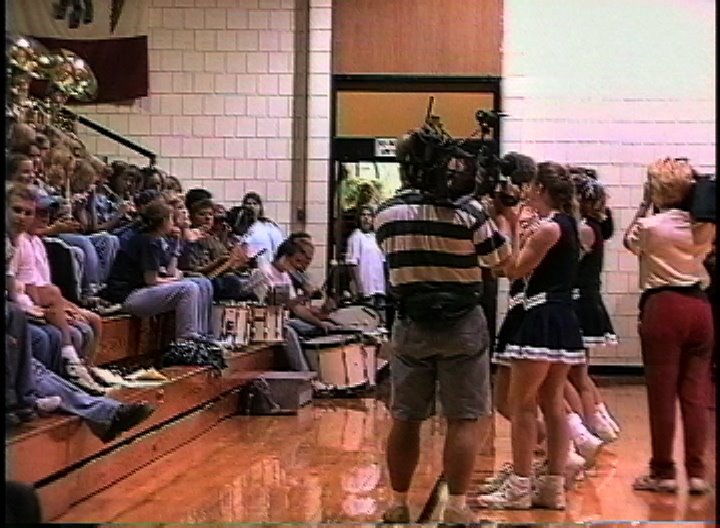
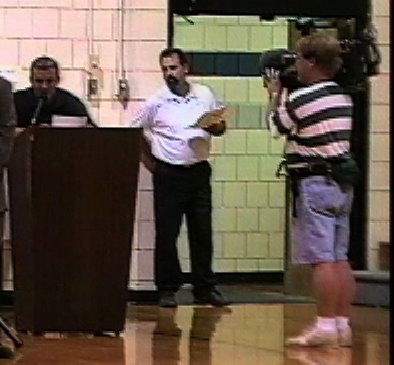
A few years back, I was helping a local high school with a special homecoming project. It's a long story, but this event was newsworthy enough to have some regional TV stations cover it. What a great opportunity to observe professional videographers and ENG crew at work.

If you look at the camera operators in these photos, they are hand-holding their heavy pro camcorders. Their footage looked excellent when I saw it on the 10pm news that night. Here are two tricks they used to make their footage look so darned good.


1. They got close to the subject.

2. They used the wide-angle setting on their zoom lenses.


Hey, these folks weren't shy about getting up close and personal when shooting video footage. So they got within a foot or two of their subjects. That not only let them fill the screen with the action, but there was another benefit. By getting so close, the on-camera microphones did a great job in picking up the audio.

Why zoom back to the wide-angle setting? By doing that, any camera movement or shaking was minimized. Remember that when you zoom in on a subject, you not only magnify the image, you magnify any shake or shimmy as you are taping.


We only have two things to work with when we produce a video...and those are PICTURE and SOUND.

By getting close to the subject and shooting at wide angle, we have good pictures.

By getting close and using the on-camera mike, we get good sound.


Remember you can't made a good video out of bad footage. Using these tricks from the pros let us shoot good footage.

Thursday, December 22, 2005

Producing a TV Newscast

District large group speech competition is just around the corner here in Iowa, and one of the categories is television Newscasting. Students are to produce a 12 to 15 minute newscast where they deliver state, national and international news. The newscast also is to include weather, sports, an original 30 or 60 second commercial and a 500 word special feature. The students have to take ownership of this project, because they are the ones writing the scripts and running the equipment.

Of course, some of the larger schools in Iowa have their own editing facilities or even their own TV studios. In order to help all schools compete on a more even footing, Prairie Lakes AEA helps out by letting students use our facilities.

Today, we had a group of students from a nearby school come in to shoot their TV News for speech contest. We started at about 9am by going over their script, blocking out which cameras will be live when each news story is being presented, and generally looking for problems and challenges in the project.

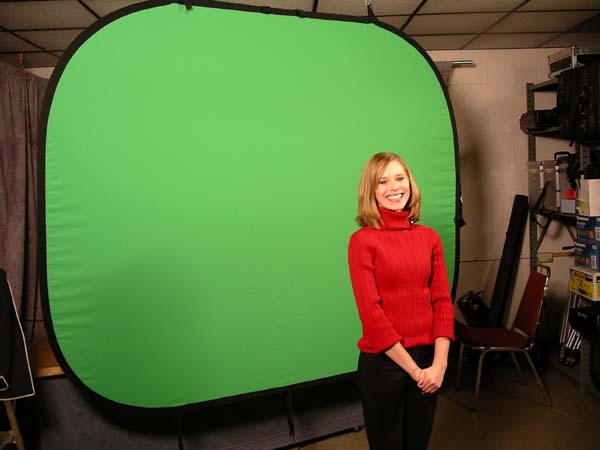
A new feature this year was our first attempt to use a chromakey in order to allow the weathercaster to stand in front of a computer generated weather map while doing the weather. That in itself was a challenge, as our lady weathercaster had to go shopping at the last minute for clothing that shot well on-camera.
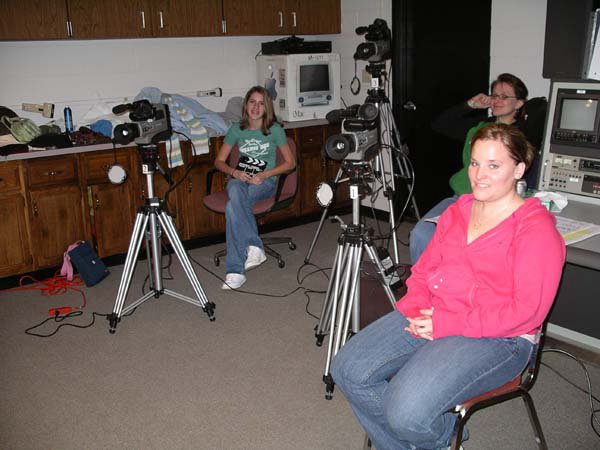
The actual shooting started about 10:30am. The house lights were turned off and studio lights turned on. Two students sat at the anchor desk, other students ran the cameras, the video switcher, the audio mixing board and the computer with our CG graphics and text. One student ran the Kron editing appliance, where we fed the "on air" video and audio signals and would later edit down the project to the final cut we'll use.

After a last minute check of everyone involved, we "rolled tape" and a young student stepped in front of the camera with the clapboard.

"Scene 1, Take 1!" And with that, she snapped the clapper on the clapboard and stepped aside, while the speech coach gave a countdown.

"Coming in 5...4...3..2..1" With that, she gave a "throw cue" to the news team.


During the day, we taped perhaps 65 segments, ranging in length from a couple of sentences to a page or so. There were multiple false starts, blown takes, giggles, mispronunciations and times when someone lost his or her place in the script. No matter how frustrated we were, everyone kept a positive and supportive attitude. We all were there to work and have fun with this project.

Finally, we finished shooting at 3pm. Most of the crew then left for a late lunch at McDonalds, while one student and I started finding the correct takes of each scene and assembled them together. Later, the students will videotape a special feature or two and edit them into the video for the final product.

Wednesday, November 16, 2005

Guidelines for Use of Copyrighted Music in Education


At some point, you or one of your students will want to use a popular song as a background in a video production. And as nice as it could be to hear a current song while you are watching football highlights, remember that you are using someone else's property without permission. And that can bring on a heap of trouble.

Remember that it's not "music," it's the "music business." Somebody owns the song, someone else owns the recording of that song. And they all hope to make money by selling what you want to steal.

But, if you buy the CD, don't you own the right to put one of the songs onto your video?

Nope.

Another question that I am asked: is it acceptable if you have a student perform the song in question, instead of using the original recording?

Remember that someone owns that song, the words and the music. So having Johnny perform the song in question is using their property without permission. It's still a copyright violation.

I've heard all the excuses for using copyrighted music:
But the kids really like it.
Who is going to know?
We're a school; nobody would sue us.
I bought the CD, isn't that good enough?

And my favorite:

But I got it on the internet...doesn't that mean I can use it?

I guarantee that sticking to the law won't make you popular with the students who want to use "their" music on a school video. But it will keep you out of trouble, and that should keep you (and your administrators) happy.

Here are some suggestions that should help you along this slippery path. And a disclaimer: I'm not a lawyer, and I don't even play one on TV. As always, consult an attorney for legal advice.


1. To be 100% safe, don't use copyrighted music without written permission from the copyright holders. Instead, use copyright-free music or buyout music.

2. If you choose to use copyrighted material, consult the Fair Use Guidelines for Music:
a. Use 10% of a song, not to exceed 30 seconds,
and do not show the finished video out of the classroom.
Do not duplicate, distribute, broadcast, webcast or sell it.

b. Proper attribution must be given when using copyrighted materials. i.e.
"I Am Your Child" written by Barry Manilow/Martin Panzer.
BMG Music/SwanneeBravo Music.

c. The opening screen of the project must include a notice that "certain materials are included under the fair use exemption and have been used according to the multimedia fair use guidelines".

d. Your fair use of material ends when the project creator (student or teacher) loses control of the project's use: e.g. when it is distributed, copied or broadcast.

3. If you wish to use more than 10% of a copyrighted song, you must obtain written gratis permission from the music publisher and the record company. This is a long process with limited chance of success.

4. Remember that music publishing firms will litigate schools and institutions who violate copyright laws. Fines can be thousands of dollars per violation.

What to wear when you are on camera

Please don't wear:

* Large amounts of white or very light pastels
* Large amounts of red or black (jackets, skirts, dresses)
* Very bright, shiny jewelry
* Fabrics with narrow stripes, polka dots, or tiny patterns with high contrast (black & white herringbone)
* Harsh makeup, very short skirts or shorts
* Don't get a haircut the day before the video shoot


Please do:

* Wear pastels, pinks, blues, greens, browns, golds (red, black and white in small amounts)
* Wear regular street makeup
* Wear jewelry that is not very shiny
* Bring compact (powder), blush, lipstick
* Make sure hair is neat
* Bring some liquid makeup in case one of the male cast members has a skin blemish

Wednesday, November 02, 2005

Multiple takes & logging while shooting

When working on a video project, I always go through the three basic steps:

Pre-production (planning)
Production (shooting)
Post-production (editing)


The key to success in a video production is organization. And I'm a rather disorganized person, so I'd like to skip that part and just keep all that information "in my head." But I've learned the hard way that a little organization during the planning and shooting stages makes life a lot easier when it comes time to edit.

In class, I always do a simple demonstration of logging an interview while taping it, to show students some techniques that make the whole process easier. It goes something like this:

Ed: "I need two students to help with this demo." And I grab a couple at random, asking them to come to the front of the class with me.

Ed: "All right, we're shooting an interview with Jenny. I'll have her stand in front of the camera, and Bret will be my gaffer." With this, I hand Bret a pencil and paper.

Ed: "Every videotape that I shoot needs a name. We'll label this tape as 'Jenny.' So I want Bret to write 'Jenny' at the top of his piece of paper. This is our Tape Log."

Bret writes this down and waits for further instructions.

"I'll start the camera rolling. Remember that we need 10 seconds of pre-roll before the action starts. While the camera is rolling, I'll ask Jenny to say and spell her full name."

Jenny looks at the camera and says, "Jenny Jones. J-e-n-n-y J-o-n-e-s."

Ed: "Very good. Jenny, I'd like you to hold up one finger, because this is Take One of the interview." Remember that the camera has been rolling during this.

Jenny holds up one finger for a minute. We're ready to start.

"All right, everyone 'stand by." This is Take One, coming in 5-4-3-2...."

And I don't say "one" because I want a moment of silence there before we begin.

I ask Jenny a couple of questions, and then I cough or clear my throat while she gives me her reply. Ah. A ruined take. I look at Jenny and say:

Ed: "I'm sorry. Guess I messed up that take. So Bret, would you write down 'Jenny interview Take 1, no good.'"


Bret does this and we continue.

Ed: "Note the camera is still rolling. Tape is cheap, so we don't bother stopping the camera or rewinding the tape between takes. Jenny, please hold up TWO fingers, so we know this is Take 2."

She does so. Bret writes down "Jenny interview Take 2" on his paper.

We do another take of the interview, and we successfully complete it. I look at Jenny and Bret.

Ed: "Were you happy with that take? Was that all right?"


They think it was fine.

Ed: "OK. The camera is still rolling, and we know it's been at least 10 seconds since Jenny finished. I'll turn the camera off, and I'd like Bret to mark 'OK' next to 'Take 2' on his log sheet."


Bret does so, and I thank both students as they go back to their desks.

Ed: "Class, when we've finished shooting everything, we'll take a big stack of tapes into the editing suite to begin putting this project together. At some point, we'll look at our script and want that interview of Jenny."

Ed: "Where do we find it?"

And the students reply, "On the tape labeled 'Jenny.'"

"What take do we want to use?"

Students: " Take 2."

Ed: "And how do we know that?"

Bret: "Because I wrote it down."

Ed: "How do we know which take is Take 2?"

Jenny : "Because I held up two fingers while you were taping to show it was Take 2."

If you use the technique of logging your takes and selecting the "good" take while you shoot it, you save a lot of effort and frustration when it's time to transfer the good stuff to your editor.

Thursday, October 06, 2005

More on Video Yearbooks

eSchool News Online has a nice article on the new generation of video yearbooks and what some tech-savy schools are doing with them. This is worth a look:

http://www.eschoolnews.com/news/showStory.cfm?ArticleID=5725

The School Video Yearbook


Today was spent in an area school where we discussed creating a video yearbook for the senior class. Actually, we're a little late in the school year to discuss planning, because some events like Homecoming have already happened. But better late than never.

Our plan for a video yearbook is to create chapters, much like those in a print yearbook. The video yearbook is meant to supplement rather than to replace the printed version, but some of the content is similar. Here is an example of chapters you could use in a video yearbook:

Example #1
I. Fall Activities
II. Winter Activities
III. Spring Activities

Example #2
I. Sports
II. Music and drama
III. Everyday life
IV. Graduation

Example #3
I. Senior collage part one
II. Football and basketball
III. Senior collage part two
IV. Life in the classroom
V. Senior collage part three
VI. Drama, arts, music
VII. Prom and graduation


Most of my smaller schools like to include a baby picture and senior picture of each graduate. Remember that some local photographers may hold the copyright on senior photos, so be sure to get clearance to use the photos. And in return, it's nice to give a "Special thanks to XYZ Photography of Silver Plume, CO" in your credits.

If each photo is on the screen for five seconds, we know that 12 pictures will take one minute to show. If you have 50 graduates, each showing a baby picture and senior picture, you are looking at 500 seconds, or nearly 8 1/2 minutes of photos. For that reason, we usually break this up into two or three chapters, so viewers don't fall asleep as the video slogs through all the photos.

Once you have decided what chapters you want in your project, you should make a "shot sheet" or "shopping list" of the video clips and/or still photos you want in each chapter. If, for example, you are working on the "Sports" chapter, you would want video or photos of:

Sports
football
Homecoming
basketball (boys and girls)
volleyball
track
cross country, golf, soccer or any additional sports.


You also might want photos of cheerleaders, pep rallies, coaches, cheering crowds, celebration bonfires or "Spirit Week" activities.

You can break this down even farther if your students can visualize what they want to see and hear on the finished video. Such as:

Football:
closeup of foot kicking ball from tee
coin toss
scoreboard showing winning score
cheerleaders
cheering crowd in stadium
two people hugging or cheering after a big win
two people crying, sad or depressed after a big loss
bus pulling into or away from school
coach giving pep talk to the team

You can see that you could easily list every shot you want in a chapter that only runs three minutes. This shot sheet is much like a shopping list. Much like you go to the store and buy milk, eggs or macaroni, you are taking your camera and obtaining video clips of "coin toss," "scoreboard" or "kickoff." Using this method, you don't shoot 10 hours of footage hoping to get four or five nice 10 second video clips.

Here is the list of steps I give students when planning their video yearbook.

1. Make an outline of “chapters” you want in your yearbook.

2. Write down the specific video clips, still photos, sound bites or interviews you want for each chapter.

3. Assign someone to videotape events you want on tape (Homecoming, Class Play, etc) Have shots of as many different students as possible, not just your friends

4. Obtain permission to use any copyrighted music.

5. Gather all still photos needed. Carefully label them so that they can be returned to owners.

6. Log tapes so you know what clips are on each tape.

7. Put still photos in the order you plan to use them in the yearbook. A still photo is on the screen for 5 seconds; so it takes one minute to show 12 photos. Make sure you don't want to show 400 photos in 10 minutes.

8. Write down all titles and credits ahead of time. Check the spelling of names.

9. Have your video planned before you come to the Video Suite to edit! Allow enough time to complete the project.

10. Plan enough time for the project.

Certain images and/or photos on this page are the copyrighted property of JupiterImages and are being used with permission under license. These images and/or photos may not be copied or downloaded without permission from JupiterImages.