Tuesday, September 27, 2005

Hand holding your camera

There are some times that you just can't use a tripod while you're shooting video. Here are some techniques to get the best possible footage while hand-holding your camera.

The primary rule of a hand held shot is DON'T USE THE ZOOM. A zoom lens magnifies the image...it also magnifies any camera movement or shake. So, instead of zooming in to fill the viewfinder, zoom back and get very close to your subject.

This has another benefit. If you are hand holding the camera, zoomed back to a wide angle setting, and are a couple of feet away from your subject, then you can capture very good audio with just the on-camera mike. I've seen professional TV ENG crews doing simple interviews like this.


If you can't get close to your subject and don't have a tripod, there are a couple of tricks you can use. Wherever possible, set the camera down on something--a wall top or railing, a table or
bookcase--any horizontal surface. To see what you're shooting, angle the viewfinder upward so that you can look through it .

If you can't steady your camera by one of these methods, try to brace yourself as you hand-hold it. Again, lean against a vertical support or prop your elbows on any handy horizontal surface. For low angles, try kneeling rather than squatting.

Here are some other good hand-holding techniques. Such as:

Hold the camera with both hands, elbows spread away from the body so that they can act as shock absorbers. You can hold your elbows tight at your sides for extra bracing.

If the shot won't run very long, hold your breath. Take a deep breath, let half of it out, then hold the rest and shoot.

If you pan the camera, stand with your feet parallel to the middle of the movement, then twist your upper body back until you can frame the beginning.

Remember, shoot hand-held footage with the lens at the widest angle setting you can. Remember that wide angle lenses tend to minimize the effects of camera shake.

Thursday, September 22, 2005

Camera shots

The worst thing you can do (at least one of the worst) is to simply turn your camera on, point it at a subject, and let it run on and on. A good video project should have a variety of camera shots. This keeps the viewer interested, allows the director to visually draw attention to important details, and generally helps the flow of the video.

When writing your script (or storyboard), you have two things to work with: picture and sound. While writing narration or dialog (sound) the scriptwriter also needs to visualize what video (pictures) will be on the screen.

Here are several camera shots, the shorthand used in scriptwriting, and some uses for each.

Long Shot (LS):

The long shot is sometimes called an establishing shot. The beginning of a scene is usually a long shot, because that establishes where the scene is taking place. For example, a video shot in the classroom might open with a long shot of the entire classroom, to tell the viewer this is where we're going to be for the next few minutes.

Long shots are good for: illustrating the setting of a scene
Bad for: showing details or holding the viewer's interest for a long time


Medium shot (MS):

A medium shot is a little closer, a little more intimate with the subject. If we go back to our example, after opening your classroom video with a LS of the entire classroom, we might now cut to a M'S of the teacher as he speaks to the class. By the way, the above shot might also be called a "One Shot" because we see one person.

Of course, that would make this MS a "Two Shot." I'm sure you can figure out why.

Medium shots are good for: drawing attention to a person or object without revealing many details.
Bad for: A medium shot is a compromise. As such, it does a good job for a lot of things, but not for revealing detail.

Close Up (CU):

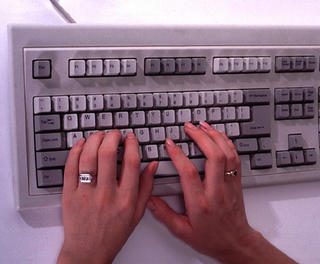
Close ups are when we get up close and personal with the subject or item we wish to illustrate. The close up is the director's way of pointing out something interesting, or essential to the plot, without any other visuals distracting the viewer.

Back to that classroom video for an example. We open with the LS of the classroom, then cut to a MS of the teacher talking about how important keyboarding skills are. At this point, we might show someone in CU typing on the keyboard while the teacher talks.

Good for: drawing attention to important detail. Also good for cutting away from the action to allow the editor to cut two takes of a scene together.
Bad for: establishing scenes.

Extreme Close Up (ECU):

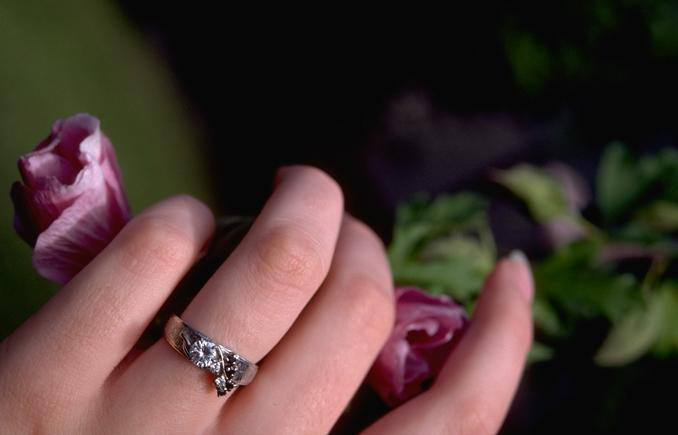
The extreme close up draws attention to something by getting extremely close. In this case, it has to be essential to the plot development, and it has to be approached gradually. If Sue has a new class ring, we can't go directly from a MS of Sue talking about her ring to an ECU of the ring; that is too jarring to the viewer. You have to work your way to getting closer to the ECU.

Like this:

LS classroom
MS teacher talking about keyboarding
CU Sue typing on keyboard
MS teacher saying that the new class rings are available and that some students already have one
ECU Sue's hand wearing ring as she types

The ECU is good for: extreme detail when important to the plot
Bad for: everything else


When deciding on what shots to use, try to imitate the human eye and how it works with the brain to receive and interpret information. If you walked into a classroom, the first thing you would do is look around. In effect, your eye is getting an "establishing shot" or LS of the classroom. If the teacher is speaking to the class, you'd probably look at the teacher next. That is your MS, and probably a "one shot" as well. As the teacher mentioned keyboarding, you might look at someone typing on a keyboard, and your eye sees a CU of hands on a keyboard. And so on.

Watch a television show, preferably a scripted show rather than a "reality" show. Identify the various camera shots you see: LS, MS, CU, ECU, one shot, two shot. See when they are used in the script and what effect they have on telling the story.

Certain images and/or photos on this page are the copyrighted property of JupiterImages and are being used with permission under license. These images and/or photos may not be copied or downloaded without permission from JupiterImages

Friday, September 09, 2005

Tuesday, September 06, 2005

Production (shooting your video)


Here is where the fun really starts. With a script in one hand and a camera in the other, you start actually shooting scenes for your video project.

Some tips will help your shoot go smoother and be more productive. Before the day of the shoot, look at that camera. You need to know how to operate it, and that’s more than just grab, point and shoot. Learn what the buttons do; for gosh sakes, learn how to turn off the day/date indicator. Nothing makes a project look more amateurish than having “August 14, 1987” in the corner of every shot. So, don’t bother setting the correct day and time, just turn that silly feature OFF.

Many cameras shoot in two different speeds, one for best quality and one for lower quality but longer recording time. Right now, I’m looking at a Panasonic miniDV tape that says 60/LP90. That means that it records 60 minutes at full quality, or 90 minutes in the lower quality Long Play (LP) mode. Whenever possible, use the higher quality recording speed setting, that is, the one that uses the tape the fastest. If you’re using a 60/90 minute tape, record at the 60 minute setting. (And since you learned what all the buttons do on your camera like I mentioned in the last paragraph, that will be a snap, right?)

Make sure your camera batteries are fully charged if you aren’t using AC current to power your camera. In fact, find a spare set of batteries and charge them as well.

Are you recording sound? Do you have a hand-held mike that will plug in to your camcorder? From experience, I know that a $20 mike placed close to your subject will sound better than a $100 mike that is 20 feet away. And if you are only using the on-camera mike, well, you are in trouble. Later in this series, I’ll post an article about shooting with the on-camera mike. For now, find a hand-held mike, plug it in to your camera and keep it close to the source of your sound.

Are you using a nice, fluid-head tripod? Whenever possible, use a tripod!

Always use new tapes for your project; it’s a very small investment that will help you succeed. If you are using miniDV tapes, you might want to exercise them first by fast-forwarding all the way to the end, and then rewinding them to the beginning. I’ve found this reduces any “drop-outs” in the picture.

When you are shooting video for later editing, you have two tricks up your sleeve.

1. You can shoot more than one take of a scene. That is, you keep doing it until you get it right.

2. You can shoot out of sequence. For instance, if you are doing a TV newscast, you can shoot the sports first and put that scene in the proper part of the newscast during editing.


All right. You are out in “the field” with your actors, your camera operator, and somebody to help haul everything around. You have a well planned script with every camera shot written down or storyboarded.

Here are some camera operator tips.

A. Frame your shot. Zoom in or out to frame the shot you want.

B. Pre-roll on each shot. Let camera roll 10 seconds before action starts.

C. Identify each take while the camera is rolling. "This is Take 1" “This is Take 2” etc. Use a clapboard for this, as well as having someone say it out loud.

D. Hold it! Keep your shot for at least 20 seconds. Don’t shoot tiny snippets of action.

E. Don't pan and zoom unnecessarily.

F. Keep the mike close to the subject, so you can hear them.

G. Post-roll on each shot. After the shot is done, let camera roll for at least another 10 seconds before stopping.

Pre-roll and post-roll are essential! Every time you start that camera, let the tape roll at least ten seconds before the action starts. And let that tape roll an additional ten seconds after the action stops before you stop recording.

If you decide that Take 3 is the best take of the first scene, Take 2 is the best of the second scene, and Take 8 is the best of the third scene, be sure to write that down on your script. Why do we have each scene identified with a “take number? When you are editing, it makes it easier to assemble your project in post production.

As an example of how easy this makes editing; imagine editing a scene into our project. Which take do we use on this particular scene? Take 3 because I wrote that down on my script. How do I identify Take 3? It’s right there on the clapboard at the beginning of the scene.

Friday, September 02, 2005

Pre-production and scripting

Writing a script can be daunting, but there is an easy way to work through the process.


Outline
Start by writing an outline. List every major point you wish to make on your video. Remember the old method of writing a script:
Tell them what you're going to tell them
Tell them
Tell them what you told them

Which translates to Introduction, Body, Summary. So, your XYZ School outline might look like:

I. Introduction
A. Several long shots of school exterior
B. Shots of interior, physical plant, students and teachers interacting
C. Some two-shots of student-student, student-teacher, teacher-teacher

II. Our new building
A. Brief history of construction of building
B. Swimming pool, little theatre
C. TV studio and production facilities
D. Up-to-date internet access, CATV television system in building

III. Fine arts at our school
A. Music department
B. Drama
C. Speech

IV. School spirit
A. Pep rallies
B. Student council meetings
C. Several shots of students and teachers at sporting event
D. Annual car wash fundraiser for charity

V. Summary
A. What have we seen?
B. What have we learned?
C. For these reasons and more, XYZ School is the perfect educational environment for your student

Notice what we did here. We took the objectives from earlier and used them for our main talking points. It's starting to take shape.

Prepare a script

Here is a big secret in producing a video. You only have two things to work with: picture and sound. So when scripting, what will we see and what will we hear?

Your script is narration and accompanying pictures, word for word. Some people use a storyboard, where they sketch the pictures wanted while writing the narration, sound effects or music.
Other people prefer creating a two-column script, with a description of the pictures used on left (this also includes the titles), narration or music listed on the right. Adobe provides a nice template for a two column script.

We all have an idea of how to write the audio (or sound) portion of the script. It's a lot like writing the reports that we've all done in school. One difference is to write for the ear. That is, select words and phrases that are pleasing to the ear, since this will be delivered aloud. Save your flowery prose for another time.

For the video (or picture) column, list every video shot you want. Note if it is a wide shot, medium, close-up, or extreme close-up shot. Be sure to use a lot of different video shots. During narration, you might change shots as frequently as every five seconds or so.

Details on pre-production planning

This is really the hardest part of a video project, and the one most students want to skip. My personal opinion is that a project lives or dies in the pre-production stage; any time saved by skipping this will be lost ten times over later in the project, during shooting or post-production. Remember, the best time to solve a problem is before it happens.

Breaking down pre-production:

Goal

What is your video about? Are we making a video about the local high school? Are we making a video about how to make pottery or how to weld? Your goal is "I want to make a video about _____."

Objectives

Video is not a "detail" medium; it paints a picture with a wide brush. So don't plan a video with tons of facts and details, a "grocery list" of information. Your main points will end up lost in the clutter.

Your viewers will probably walk away with about three main themes from your project. These could be informational, they could be emotional. What three things do you want your viewer to remember when they see a video about, for example, XYZ High School?

A. My school has an outstanding fine arts department, with speech, drama and music.
B. My school is a new facility, with up-to-date internet access, student TV studio, and swimming pool.
C. There is a strong sense of camaraderie at my school, a very tangible school spirit.

Treatment
This is how you will tell your story?

Will you have someone on-camera, walking around with a mike in hand and narrating?
Will you have an "off-camera" unseen narrator?
Will you play act, with Johnny meeting Sue, the new student? Sue doesn't know anything about XYZ High School, so Johnny takes her on a tour, all the while telling her the information we want to convey.
Will you have two sock puppets on camera?


Target audience
Who will be the primary audience of your video. Don't say "everybody" because I doubt that small children in Afghanistan or chocolate makers in Switzerland will be seeing this. Narrow down your target audience by:
Age
Geographic location
Gender if relevant
Special needs or special skill if relevant
Essential information if relevant


So your target audience may be:
High school age students, boys and girls
Lives in or near the communities served by XYZ School
Speaks English
Plans to attend XYZ School, or is considering transferring to it


(Note: the reason I listed "speaks English" as part of the target audience is that you may be called on to produce a video that is not in your native tongue, which is English in my case. I once produced a video for the Department of Human Services, who needed a Spanish language video that would explain the services they provide to Spanish-speaking people who had just moved to the area. Not speaking the language myself, it proved to be quite an adventure.)

The target audience and the treatment are intertwined; knowing who you are speaking to determines how you communicate information to them. If your target audience was 6 year olds, then the "Sock puppet" treatment might be a good idea. However, if you want high income parents to transfer their children to the XYZ School, you might want to skip the sock puppets.

Budget in time and budget in dollars

You need a realistic idea of how much time you can devote to the project and how much money you'll plan to spend. If your project is due tomorrow and you have $5 in your pocket, then you'll need to keep everything simple and easy.

After you know these things: goal, objectives, treatment, target audience, budget in time and dollars; only then are you ready to put pen to paper and start scripting.

Pre Production (planning your video)

1. Planning your shoot
A. Goals.....................What is your video about?
B. Objectives...............Things your audience will recall
C. Treatment...............How will you tell your story?
D. Target Audience........Who will watch this?
E. Budget...................How much time & money?

2. Write an outline. List every major point you wish to make on your video.

3. Prepare a script. This is a word for word, 3 column script, with visuals on left (this also includes the titles), narration on the right and music in the middle. You can also do this visually on a storyboard. List every shot you want. Note if it is a wide shot, medium, close-up, or extreme close-up.

In the next blog entries, we'll go into more detail on planning a project

Thursday, September 01, 2005

What editing equipment do I need?

In the past, video editing was done by copying scenes from the original tape to a new “master” tape, with the resultant lost of quality as your finished project was “down one generation” from the master tape. Although there are a few JVC Edit Desk systems still out there, most student editing will be on a non-linear(computer) editor.

There are two types of non-linear editors available. The first type is the editing appliance. An editing appliance is a specialized computer that is really an “editor in a box.” While it has a hard drive, keyboard and mouse or trackball, you can only edit video with it. You can’t go online; write an email to a friend, or other traditional computer functions.

However, because these appliances are specialized, their operating systems are simple and pretty easy to learn. MacroSystem makes the Casablanca line of editing appliances, with the Prestige, Kron, Claro and Avio as different models in their line. I use the Kron and Avio with my students and have been happy with their performance. There are other appliances out there that I haven’t worked with, such as the ScreenPlay by Applied Magic.

If you’d rather use your own computer for editing, there are several software packages available. For the Mac platform, you can’t beat their iLife ’05 package of software. It includes iMovie, a pretty powerful little editing package for a beginner. iDVD lets you take your finished iMovie and create your own DVD, complete with chapter markers and a professional looking menu screen your DVD. iLife also has iTunes to play your MP3 files, iPhoto to store and display your digital photos, and an amazing audio program called GarageBand. In GarageBand, you can select from pre-recorded audio loops of drums, bass, piano and other instruments to create original music. I’ve also used it as a sound-on-sound recorder, in case you have a singer who would like to sing harmony with herself. GarageBand can also be used as an audio editor, to let you cut, paste and edit music or voice. iLife is unbelievable, and the education price is something like $59.00. If you run Mac OS X, take a serious look at this.

For the PC, there are more editing software packages out there than you can shake a stick at. Windows SP offers Windows Movie Maker as a part of the system software. It is a basic editor at no additional cost. Some folks swear by it, my personal wish is for a package with more features. At home, I am using Adobe Premiere Elements, selling for around $100. A trimmed down version of Adobe Premiere, it still have enough features to keep a beginning or intermediate editor satisfied.

Other PC editing software includes Pinnacle Studios Media Suite, ULead Media Studio, Sony Vegas and a lot more. Avid offers Avid Free DV, a free sample version of the Avid line of editors. While it is short on features, you can’t complain about the cost.
And folks, there are a hundred other vendors and products out there that I have failed to mention. This is by no means a complete list, but a taste of what you can find.

When shopping for computer based editing software, be sure that the package you buy has all the features you want. For example, make sure it has DVD authoring if you want to burn your finished video to DVD.

Is your new computer powerful enough to edit video? First off, you need at least 512 MB of memory, and 1 GB is even better. It helps to have two hard drives, one with the system software, and one dedicated to editing files. If possible, get a disk drive with a spindle speed of at least 7200 RPM, a buffer of 4 or 8 MB and a storage capacity of at least 200 GB.

Stay away from the low cost processors like the Celeron. While good for some functions, you need more power when editing.

You computer will need a Firewire (IEEE 1394) port. If your desktop system doesn’t have one, you can add a Firewire card for about $40 to $50.

Be sure to look at the system requirements when you buy your software, and be very sure your computer is powerful enough to run it. Believe me, you won't edit digital video on your SX386 Packard Bell.

Remember when I said you should keep some aspirin at the ready? This might be the time to reach for a couple. While all of this seems kind of daunting right now, it does get easier. We’ve talked about some of the tools that you need to be a video producer at school; next we'll talk about the training and techniques you'll need to create your first video.