Van Harden of WHO Radio read this on the air this morning, in honor of the first day of school. It is written by Dan Valentine and is something for teachers and parents to remember.
I Trust You'll Treat Her Well
By Dan Valentine --
Dear World: I bequeath to you today one little girl…in a crispy dress…with two blue eyes…and a happy laugh that ripples all day long…and a flash of light blond hair that bounces in the sunlight when she runs. I trust you will treat her well.
She’s slipping out of the backyard of my heart this morning…and skipping off down the street to her first day of school. And never again will she be completely mine. Prim and proud she’ll wave her young and independent hand this morning and say “Goodbye” and walk with little lady steps to the schoolhouse.
Now she’ll learn to stand in lines…and wait by the alphabet for her name to be called. She’ll learn to tune her ears for the sounds of school-bells…and deadlines…and she’ll learn to giggle…and gossip…and look at the ceiling in a disinterested way when the little boy across the aisle sticks out his tongue at her. And, now she’ll learn to be jealous. And now she’ll learn how it is to feel hurt inside. And now she’ll learn how not to cry.
No longer will she have time to sit on the front porch steps on a summer day and watch an ant scurry across the crack in the sidewalk. Nor will she have time to pop out of bed with the dawn to kiss lilac blossoms in the morning dew. No, now she will worry about the important things…like grades and which dress to wear and who’s best friend is whose. And the magic of books and learning will replace the magic of her blocks and dolls. And she’ll find new heroes.
For five full years now I’ve been her sage and Santa Claus and pal and playmate and father and friend. Now she’ll learn to share her worship with her teachers…which is only right. But, no longer will I be the smartest, greatest man in the whole world. Today when that school bell rings for the first time…she’ll learn what it means to be a member of the group…with all its privileges and its disadvantages too.
She’ll learn in time that proper young ladies do not laugh out loud…or kiss dogs…or keep frogs in pickle jars in bedrooms…or even watch ants scurry across cracks in sidewalks in the summer.
Today she’ll learn for the first time that all who smile at her are not her friends. And I’ll stand on the front porch and watch her start out on the long, lonely journey to becoming a woman.
So, world, I bequeath to you one little girl…in a crispy dress…with two blue eyes…and a happy laugh that ripples all day long…and a flash of light blonde hair that bounces in the sunlight when she runs. I trust you’ll treat her well.
Thursday, August 21, 2008
Wednesday, July 02, 2008
What is the lifespan of a VHS Tape?
 I just got off the phone with one of the teachers that we serve here at AEA. She had a tech problem. She had videotaped an interview with her father back in 1982 or so, and now she would like to transfer that tape to a DVD. Dad has since passed on and this tape has some irreplaceable memories that she would hate to lose.
Unfortunately, the tape is in bad shape due to age. The sound is intermittent, and the picture is grainy and filled with drop-outs.
OK, as Ross Perot used to say....here's the deal.
 VHS tapes were made starting in 1977 when the RCA Selectavision VTB 200 was released as competition to the Sony Betamax. I know, because I was one of the first to buy this $1000 toy, even though I was working as a Disc Jockey in a small AM radio station and earning next to nothing at the time. I wish I had invested that thousand bucks instead....but I digress.
I still have some videos I taped over 30 years ago, and they are disintegrating. The quality of the picture and sound gets worse by the day and there is no way to recover it once it's gone.
Also, videotapes used to be expensive... $25 for a single T120 back in the 70's and early 80's. So lots of people bought cheaper, off-brand tapes. And those have an even shorter lifespan than the brand-name tapes, because they used cheaper materials when they were manufactured.
Now if we're talking about an old Leon Spinks heavyweight fight tape, then I can live without it. (Sorry, Leon.) But if I had a VHS tape of my parents from the 80's, I would want to preserve it.
So the smart thing is to have any precious tapes transferred to DVD as soon as possible. If you want to do it yourself, then there are several VCR-DVD units for sale that will allow you to copy personal tapes. A Yahoo shopping search on "vcr dvd-r" gave me 491 hits for units I can buy for as little as $120. Check your favorite electronics retailer for a good deal if you are a DIY kind of person. Just remember to use a quality recordable DVD disc when you do the transfer. Don't skimp on the blank DVD-R like you probably did with the blank VHS tape 25 years ago.
If you'd rather turn over this task to the professionals, there are businesses like Walgreens who provide this service. I'm sure there are others as well, so ask the photo department at Costco, Wal-Mart, Target or wherever you shop if they transfer VHS tapes to DVD.
For maximum shelf life of a VHS tape, store it upright, like a book in a bookcase. Keep it in a climate controlled room...not in a wet basement or a hot and dry attic. And always keep the dust sleeve on the tape.
But most of all, if you have anything on tape that is 15 years old or older, look into having it transferred to DVD as soon as you can. Ten years from now, you'll thank me for it.
Monday, February 04, 2008
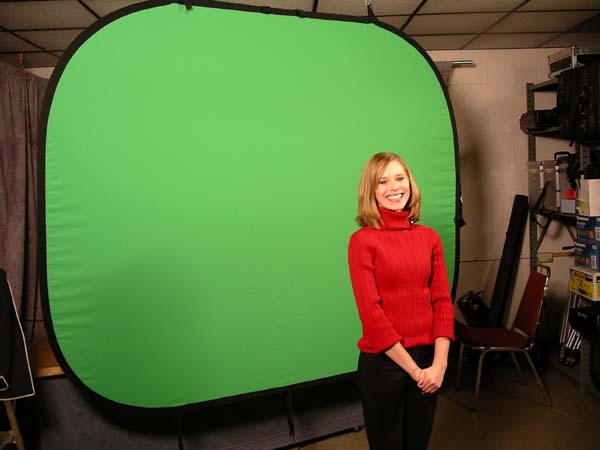
More greenscreen tips and ideas

Greenscreen, chromakey, bluebox, keying....all different words for a technique used to layer one image over another. And keying is almost as much an art as it is a science.
We've just finished taping about six weeks worth of television and radio newscasts for speech contest, and in the process, we've had about every technical problem possible occur. Right now, I'll concentrate on some things we've learned about greenscreening.
We used greenscreen for weathercasts and for a virtual background for sports and special features, and keyed the background whike shooting (as opposed to keying in post production). These ideas apply to both situations.
1. Lighting. If possible, light the screen separately from the talent. Your goal is to create a flat, even light on the screen. Shadows or light and dark areas all make a clean key more difficult. which brings us to...
2. Distance. Have your talent at least three feet away from the greenscreen. Any shadow that falls on the screen will mess up your attempt to key. So, if you move the talent farther away from the screen, their shadow falls on the floor instead of on the screen.
3. Put your camera on manual focus, and then focus carefully on the talent. The easiest way to do this is to zoom in to the talent, focus, and then zoom back to the desired focal length. This throws the background out of focus, which hides wrinkles and imprefections in the greenscreen.
4. Set your camera to manual exposure. If it's on auto-exposure, then any change in the exposure setting will mess up your key. Something as simple as the talent holding up their script can change exposure, which changes your key, which drives you crazy. So, switch to manual exposure.
5. Wardrobe. I've had good luck with the talent wearing darker colored clothing, but to be safe, I ask them to bring two outfits...if one doesn't key well, perhaps the other one will. Also, stay away from frizzy or spiked hair-dos. That irregular edge will give your talent a green halo.
6. Weather maps or backgrounds should be a darker color. If the JPEG you are keying is white or a light color, any green fringing is obvious to the viewer. A darker JPEG helps to hide fringing.
7. Place a monitor on both sides of your talent. If the camera is at 12 o'clock and your talent is at 6 o'clock, you should have a monitor at 10 and 2 o'clock. These monitors should show the chromakey output, so the weatherperson can see what the heck they ar pointing at.
8. Let your talent practice before you shoot. Pointing out in thin air and hoping you are pointing at Phoenix or Pittsburg takes some practice. Let them get the feel of this virtual world before the cameras roll.
And finally, take your time. It seems like taping a weathercast is one of the most stressful jobs when producing a TV newscast. So don't assume you can crank out a five minute weathercast in ten minutes. Plan enough time to keep your talent (and you) from stressing out.
Monday, August 20, 2007
Student Cam Contest and C-SPAN Campaign 2008 Bus

C-SPAN is currently touring the country with a refitted bus that they use to shoot and edit video about the upcoming election. The brightly painted bus is named Campaign 2008, and it draws a crowd wherever it goes.
C-SPAN staff members opened the bus for tours in Iowa recently. Doug Hemmig explained the C-SPAN philosophy of recording the news while it happens. The front half of the bus was their edit bay, with a video switcher, audio switcher, monitors and editing equipment. The back half of the bus could be used as a mini-studio.

After the tour, I spoke with Adrianne Hoar, education coordinator with C-SPAN. And she told me of an opportunity that is available for middle and high school students.
Student Cam is an annual video documentary competition, where students produce a ten minute documentary on a topic of current political interest and then submit it to C-SPAN. Footage taped from C-SPAN or obtained from their online archives must be used. Additional material may be used if it falls under the Fair Use for Education copyright guidelines. Cash prizes are awarded, and winning entries are posted on the Student Cam website.

Adrianne Hoar and Rebecca Stewart, both C-SPAN employees, were knowledgeable and helpful in explaining this opportunity. I will be encouraging instructors to share this with their student video producers. It looks like a great chance to incorporate technology into the classroom while learning more about the political world around us.
Check out this link to learn more about C-SPAN and Student Cam.
Wednesday, July 25, 2007
What can you do when editing?

Post production (editing) is when you transfer your video clips to the editor and start putting things together. So, what things can you do when you edit your raw video footage?
Remember, you only have two things to work with: audio and video. So, what can you do when you edit?
Audio: 
Add music
Add sound effects
Add narration
Adjust volume
 Video:
Trim clips to the exact length you want
Add titles
Add transitions (cross fades, page turns)
Add effects (black & white, slow-mo, backwards, etc)
Add scenes in any order you want
Remember that if you shot several “takes” of a scene, you need only use the best take. Also, you can put scenes in whatever order you like. It doesn’t have to be in the same order you shot it.

What can’t you do??
Make a blurry picture sharp and in focus.
Remove the “shake” from a shaky shot
Turn the audio up a lot, so a very soft voice is easy
to hear.
Remove background noise to make voice easy to hear.
Remember you can’t make a silk purse out of a sow’s ear. To have the best finished product, start out with good video and good audio. You can’t “fix it in post.”
Wednesday, May 16, 2007
Picture But No Sound?

This happens occasionally in our Prairie Lakes AEA Lending Library. A school will return a videotape with a Post-In note attached, saying that when they played the videotape, there was a picture but no sound. Most of the time, the sound is there but the school VCR could not find it.
If this happens, here is the “short answer.”
1. Look at the remote for your VCR. Is there a button marked AUDIO (or perhaps SOUND)? If so, press the button.
 2. If you don’t have an AUDIO or SOUND button, then you’ll have to access the MENU for your VCR. What you want to do is change the AUDIO output from HI-FI to NORMAL.
 Every menu looks a little different, so I can’t post detailed instructions for your specific equipment.
All right, if you would like to know the theory behind what we just did, here is the “long answer.”
On every VHS tape, the following information is recorded:

A: This is the NORMAL (or LINEAR) audio track. Every VCR, even the oldest RCA SelectaVision VCR from 1977 records audio here.
B: This is the VIDEO TRACK. As you can see, the video is recorded as stripes on an angle.
C: This is the CONTROL TRACK. The control track records 30 electronic pulses per second that are used to synchronize the tracks.
For many VCRs, including very old and very inexpensive ones, this is everything that’s recorded on the tape.

D: Most newer VCRs also are able to record and playback audio in high fidelity sound, or HI-FI. The HI-FI track is embedded in the video track. Our illustration shows the HI-FI track in red.
Sometimes, because of equipment failure or operator error, a Hi-Fi audio track is recorded with no sound. (It’s like there is a highway with no cars on it.) When you play such a tape, your VCR senses there is a Hi-Fi track and plays it. But no sound was recorded on that track…it’s just an empty audio track. So you have picture and no sound.
The solution is to tell your VCR to quit horsing around and just play the NORMAL audio track.

If you are lucky enough to have the remote handy, and if the remote has an AUDIO button, it’s a simple matter to switch from HI-FI to NORMAL audio playback. If that’s not an option, then you have to open the MENU on your VCR and find the AUDIO or SOUND command, and switch that to NORMAL.
Unfortunately, we do sometimes discover a tape with this problem in our library. By selecting the NORMAL audio track playback on your VCR, you will be able to work around this problem and show your video tape in class as planned.
Friday, October 27, 2006
Greenscreen tips and ideas
If you are interested in shooting scenes using chromakey (also known as greenscreen, bluescreen or bluebox), here is an interesting blog that discusses shooting chromakey for post production.
At the 2006 VidExpo this fall, a graphic artist from a Denver television station discussed shooting greenscreen for post production.
Many of us think of using an external box or video switcher to create greenscreen effects in real time. And while this may be the way to go when you are shooting a weatherperson in front of a map, it's not always the best way to go.
You can make some fascinating composite video clips by using the greenscreen capabilities of Final Cut Pro, or even something as simple as an Avio or Casablanca editing appliance.
Take a look at the linked article and see if you can stretch your imagination when keying in your next project.
Friday, September 22, 2006
Planning a video yearbook
In the old days (back when I was in High School) everyone would get a printed, hardbound yearbook at the end of the school year. You remember those....there would be photos of all the class members, sports highlights, music concerts, plays and a lot of shots of students goofing around.
Here in the 21st century, the old style printed yearbook still is around. However, more and more schools across the country are producing video yearbooks in addition to the more traditional printed yearbook. In a video yearbook, you show the visuals and sounds that make your High School years memorable.
The key to a video yearbook is planning ahead of time. When I work with schools who want to produce a video yearbook, I try to have a planning session with them during the first three weeks of school, so they have an idea of what they need to do before Homecoming and other events occur. It's tough to shoot video of the Homecoming game if it is already over.
You start by thinking of your video much like a printed book. Books have chapters, and so do video yearbooks. What chapters will your video have? Sports? Fine arts? Speech contest? Mock trial? Everyday life in the classroom?
What do schools include in a Video Yearbook?
How will you sort your images into "chapters"?
Example #1
I. Fall Activities
II. Winter Activities
III. Spring Activities
Example #2
I. Sports
II. Music and drama
III. Everyday life
IV. Graduation
Example #3
I. Senior collage part one
II. Football and basketball
III. Senior collage part two
IV. Life in the classroom
V. Senior collage part three
VI. Drama, arts, music
VII. Prom and graduation
Here are the steps I recommend:
1. Make an outline of “chapters” you want in your yearbook.
2. Write down the specific video clips, still photos, sound bites or interviews you want for each chapter. Find out what you may already have.
3. Assign someone to videotape events you need (Homecoming, Class Play, etc). Have shots of as many different students as possible, not just your friends
4. Obtain permission to use any copyrighted music.
5. Gather all still photos needed. Carefully label them so that they can be returned to owners.
6. Log tapes so you know what clips are on each tape.
7. Put still photos in the order you plan to use them in the yearbook. A still photo is on the screen for 5 seconds; so it takes one minute to show 12 photos. Make sure you don't want to show 400 photos in 10 minutes.
8. Write down all titles and credits before you begin editing. Check the spelling of names.
9. Allow enough time to complete the project. Then add an additional 25% to that, because something always ends up taking longer than you thought it would.
Here in the 21st century, the old style printed yearbook still is around. However, more and more schools across the country are producing video yearbooks in addition to the more traditional printed yearbook. In a video yearbook, you show the visuals and sounds that make your High School years memorable.
The key to a video yearbook is planning ahead of time. When I work with schools who want to produce a video yearbook, I try to have a planning session with them during the first three weeks of school, so they have an idea of what they need to do before Homecoming and other events occur. It's tough to shoot video of the Homecoming game if it is already over.
You start by thinking of your video much like a printed book. Books have chapters, and so do video yearbooks. What chapters will your video have? Sports? Fine arts? Speech contest? Mock trial? Everyday life in the classroom?
What do schools include in a Video Yearbook?
Senior portraits
Music, drama or other activities
Competitions & Awards
Every day life at school
Teachers
Sports
How will you sort your images into "chapters"?
Example #1
I. Fall Activities
II. Winter Activities
III. Spring Activities
Example #2
I. Sports
II. Music and drama
III. Everyday life
IV. Graduation
Example #3
I. Senior collage part one
II. Football and basketball
III. Senior collage part two
IV. Life in the classroom
V. Senior collage part three
VI. Drama, arts, music
VII. Prom and graduation
Here are the steps I recommend:
1. Make an outline of “chapters” you want in your yearbook.
2. Write down the specific video clips, still photos, sound bites or interviews you want for each chapter. Find out what you may already have.
3. Assign someone to videotape events you need (Homecoming, Class Play, etc). Have shots of as many different students as possible, not just your friends
4. Obtain permission to use any copyrighted music.
5. Gather all still photos needed. Carefully label them so that they can be returned to owners.
6. Log tapes so you know what clips are on each tape.
7. Put still photos in the order you plan to use them in the yearbook. A still photo is on the screen for 5 seconds; so it takes one minute to show 12 photos. Make sure you don't want to show 400 photos in 10 minutes.
8. Write down all titles and credits before you begin editing. Check the spelling of names.
9. Allow enough time to complete the project. Then add an additional 25% to that, because something always ends up taking longer than you thought it would.
Friday, September 08, 2006
Hand holding your camera

There are some times that you just can't use a tripod while you're shooting video. Yet you still want clear audio and a crisp picture without shaking or distracting camera movement. So, what do you do?
A few years back, I was helping a local high school with a special homecoming project. It's a long story, but this event was newsworthy enough to have some regional TV stations cover it. What a great opportunity to observe professional videographers and ENG crew at work.
If you look at the camera operators in these photos, they are hand-holding their heavy pro camcorders. Their footage looked excellent when I saw it on the 10pm news that night. Here are two tricks they used to make their footage look so darned good.
1. They got close to the subject.
2. They used the wide-angle setting on their zoom lenses.
Hey, these folks weren't shy about getting up close and personal when shooting video footage. So they got within a foot or two of their subjects. That not only let them fill the screen with the action, but there was another benefit. By getting so close, the on-camera microphones did a great job in picking up the audio.
Why zoom back to the wide-angle setting? By doing that, any camera movement or shaking was minimized. Remember that when you zoom in on a subject, you not only magnify the image, you magnify any shake or shimmy as you are taping.
We only have two things to work with when we produce a video...and those are PICTURE and SOUND.
By getting close to the subject and shooting at wide angle, we have good pictures.
By getting close and using the on-camera mike, we get good sound.
Remember you can't made a good video out of bad footage. Using these tricks from the pros let us shoot good footage.
Thursday, December 22, 2005
Producing a TV Newscast
 District large group speech competition is just around the corner here in Iowa, and one of the categories is television Newscasting. Students are to produce a 12 to 15 minute newscast where they deliver state, national and international news. The newscast also is to include weather, sports, an original 30 or 60 second commercial and a 500 word special feature. The students have to take ownership of this project, because they are the ones writing the scripts and running the equipment.
Of course, some of the larger schools in Iowa have their own editing facilities or even their own TV studios. In order to help all schools compete on a more even footing, Prairie Lakes AEA helps out by letting students use our facilities.
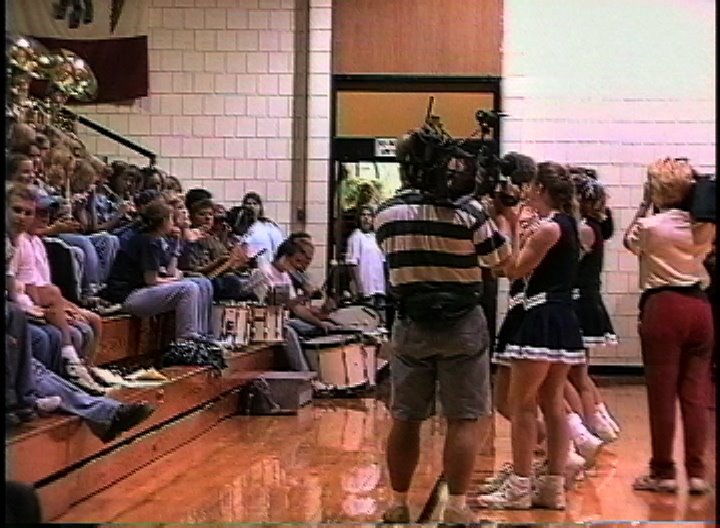
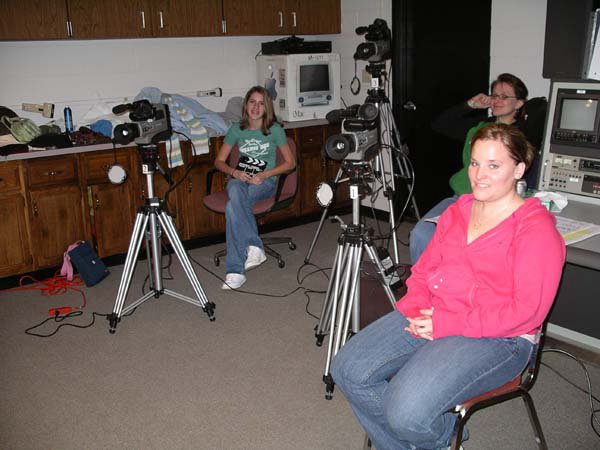
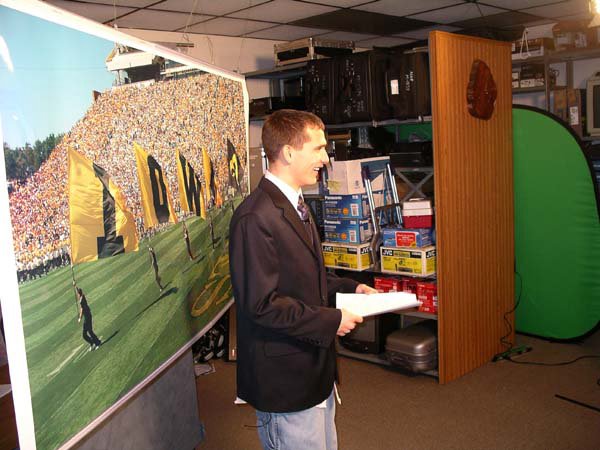
Today, we had a group of students from a nearby school come in to shoot their TV News for speech contest. We started at about 9am by going over their script, blocking out which cameras will be live when each news story is being presented, and generally looking for problems and challenges in the project.
A new feature this year was our first attempt to use a chromakey in order to allow the weathercaster to stand in front of a computer generated weather map while doing the weather. That in itself was a challenge, as our lady weathercaster had to go shopping at the last minute for clothing that shot well on-camera.
The actual shooting started about 10:30am. The house lights were turned off and studio lights turned on. Two students sat at the anchor desk, other students ran the cameras, the video switcher, the audio mixing board and the computer with our CG graphics and text. One student ran the Kron editing appliance, where we fed the "on air" video and audio signals and would later edit down the project to the final cut we'll use.
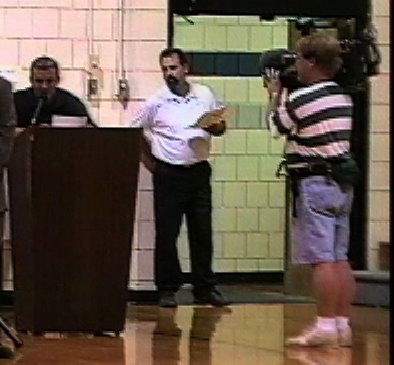
After a last minute check of everyone involved, we "rolled tape" and a young student stepped in front of the camera with the clapboard.
"Scene 1, Take 1!" And with that, she snapped the clapper on the clapboard and stepped aside, while the speech coach gave a countdown.
"Coming in 5...4...3..2..1" With that, she gave a "throw cue" to the news team.

During the day, we taped perhaps 65 segments, ranging in length from a couple of sentences to a page or so. There were multiple false starts, blown takes, giggles, mispronunciations and times when someone lost his or her place in the script. No matter how frustrated we were, everyone kept a positive and supportive attitude. We all were there to work and have fun with this project.
Finally, we finished shooting at 3pm. Most of the crew then left for a late lunch at McDonalds, while one student and I started finding the correct takes of each scene and assembled them together. Later, the students will videotape a special feature or two and edit them into the video for the final product.
Subscribe to:
Posts (Atom)